Let’s go back to where it all began for Hope Technology.
Disc brakes were the first product we made – at a time when they were almost unheard of on bicycles. Times change and thirty years on you’ll be hard pressed to find a new mountain, gravel or cyclocross bike without disc brakes. They’ve even made huge inroads into the world of road bikes.
Despite disc brakes being around for so long, there’s still a lot of myths and confusion about them. We are here to cut through the crap and give you a no nonsense guide. Along the way, hopefully we can guide you through what we think makes Hope brakes the best stoppers out there. Then we’ll explain how to get the most of your brakes, from set up to maintenance.
We’ll be honest. We’ve geeked out a little here. If you want to jump to a specific section, click on one of the links below…
What makes Hope brakes so good?
What brake fluid is best?
Choosing the right Hope brake for your use
What disc?
Setting up your brakes to get the most out of them
Brake bleeding
Other maintenance tips
What makes Hope brakes so good?
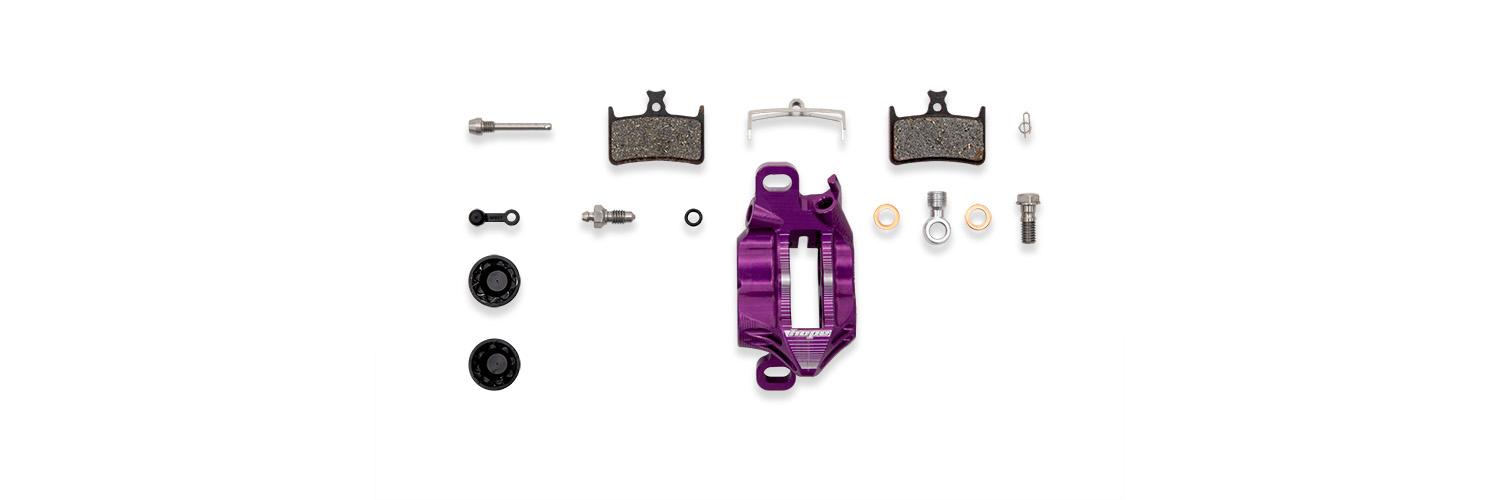
We’ve now got thirty years worth of experience in making the best disc brakes in the business. We apply that knowledge to our entire range. Every single part of our brakes (apart from the pads and hoses) are made in our Barnoldswick factory.
All our brake calipers are still CNC machined as a single piece – maximising the power on offer. Having said that, power isn’t the be all and end all when it comes to brakes. Being able to control that power is just as important. Anyone can make a brake that locks a brake. We have put all our experience into making a brake that allows you to modulate that ample power in a consistent way, every time you pull the lever, whether that’s at the top of a long descent or at the bottom.
Finally, we build our brakes to last and (unlike other manufacturers) if a part in either our caliper or master cylinder/lever needs replacing… well, you can do just that. We absolutely guarantee that spare parts for your brake will be available for a minimum of ten years after you buy your brake. Put simply, this means that your brake can be rebuilt and will keep on trucking long after you’ve bought them. In fact, we currently hold spares for even our original disc brakes! We see so many of our customers moving their Hope brakes on to successive new bikes as they love the Hope look and feel.

What brake fluid is best?
Before we go any further, it’s worth understanding what the fluid’s job in the brake actually is. If you use the analogy of a cable operated brake, the fluid is the cable. In this case we use the incompressible characteristic of the liquid as a means to transfer the force from the master cylinder (at the lever end) to the caliper. We could picture it as a solid column of fluid locked in the brake hose. Pull the lever, the liquid gets pushed down the hose and pushes out the brake pistons.
Beer in your brakes?
So, at this point any fluid could work, water, olive oil, alcohol, but not beer as it contains gas! Why is gas a problem? Well, because gas is compressible. That means that some of the braking force at the lever wouldn’t make its way down to the pistons. It’s the reason we work hard to remove any trapped air when bleeding brakes.
Don’t believe us? Well, one of our team once lost the fluid from his rear brake after a crash damaged the connection between the hose and caliper (we’ve since redesigned this area to help protect it from this kind of damage). Facing a long walk down the mountain, he reattached the hose and topped up the system with water from his drinks bottle. Thanks to some quick thinking (and one of the benefits of DOT brake fluid… more on that below), he was able to enjoy the descent as normal!
DOT or mineral?
Okay, so we’ve ruled out using beer in your brakes, but what fluid is best? In the bicycle industry two types of brake fluid are used: DOT brake fluid and mineral oil. There are a lot of misconceptions about both and each has its advantages and disadvantages. Let’s take a look at how they perform.
We now understand that we want to avoid getting gas into the system. There’s two ways this can happen. The obvious scenario is if part of the system is opened up and air gets in. The other method is if the liquid vaporises (boils). When braking all the kinetic energy of the moving wheel has to go somewhere and most of it is transformed to heat. Some of that heat is transmitted from the brake pads to the caliper to the fluid. We therefore definitely want to use a fluid that has a boiling point higher than its likely to experience under heavy braking. In general, the higher the boiling point, the better.
There’s loads of different mineral oils out there. Their boiling point varies from 120°C up to 270°C depending on the manufacturer, and unlike DOT it isn’t regulated by any standard or organisation. If you have brakes that use mineral oil, make sure you use the manufacturer’s recommended oil.
Not everyone knows that DOT stands for Department of Transportation. As the name suggests, DOT fluid is widely used in the automotive industry and there are set standards around boiling point for different DOT fluids. DOT5.1 fluid will have the same characteristics, regardless of who made it. It has the highest boiling point (270°C) of commonly used DOT, so is most often used in bike brakes.
What about the real world?
So far so good…
It’s one thing thinking about brakes when they are just set up, but what happens in the real world? To start off with, humidity eventually gets into the system. Small amounts of water can get through the skin of the hose and creep through seals over time.
(2).jpg)
When water does get in, the fluids behave in different ways. Mineral oil is hydrophobic, meaning that it doesn’t mix with the water. On the plus side, this means that its boiling point doesn’t change. On the down side the boiling point of the brake system is defined by the weakest liquid, so is reduced to 100°C. To make matters worse, water is heavier than mineral oil, so it tends to pool at the caliper, where it is subject to the most heat. Doh!

DOT fluid is hygroscopic (it absorbs water) and that’s generally thought of as one of its drawbacks. As DOT absorbs water (even just from the air), the boiling point gradually falls. On the upside, this means that your brake is much more tolerant to water contamination. On the downside, it’s best to not go buy a huge bottle of DOT fluid as its shelf life once opened will be limited. Buy small volumes and don’t use an open bottle after a year or two.
.jpg)
DOT for the win?
At Hope Technology we have decided to use DOT5.1 brake fluid because, in our opinion, it offers the best performance even in suboptimal conditions. It has the added benefit of being widely available thanks to its use in the automotive industry.
Handling brake fluid
Both DOT and mineral oil should be handled with precaution, wearing safety glasses and gloves. DOT is more corrosive to paint but it doesn’t strip it in seconds. Just make sure you clean up any spills after the event. Despite its more friendly name and reputation, mineral oil isn’t exactly good for you either, so avoid repeated contact with skin.
Remember that DOT and mineral oil are not interchangeable. If your current brakes use mineral oil, do not bleed them with DOT (and vice versa). The seals each fluid requires are incompatible and you’ll end up with a very poorly brake very quickly.
Finally, both fluids should be discarded responsibly in recycling centres following your local regulations. Never dispose of it down the drain or elsewhere.
Choosing the right Hope brake for your use
Hopefully by this stage, you are convinced that Hope is for you, but which of our brakes best suits your needs?
If you are looking for a mountain bike brake, we have three main options: The X2 is a twin piston brake best suited for cross country. The E4 is a four piston brake designed for scenarios where more power is needed, from trail riding to all mountain. Finally the V4 is another four piston caliper, designed for enduro racing, downhill, tandems and e-bikes. The V4 caliper also spaces the brake pads slightly further apart, so it can accommodate our unique vented disc design.
Four piston brakes are a little more powerful and are physically bigger, so cool quicker too. Essentially, more pistons acting on the rotor equals greater braking power, all other things being equal. We size up the caliper slightly to make sure the body doesn’t flex under the additional pressure, although we are careful to keep weight to a minimum. The downside is that they are still a little heavier and not everyone wants the extra power. (If that’s you, then the X2 is perfect for your needs).
The X2 and E4 are both available either with Tech3 or Race levers. The race levers are lighter, while the Tech builds in tool free bite-point and reach adjust.
.jpg)
What disc?
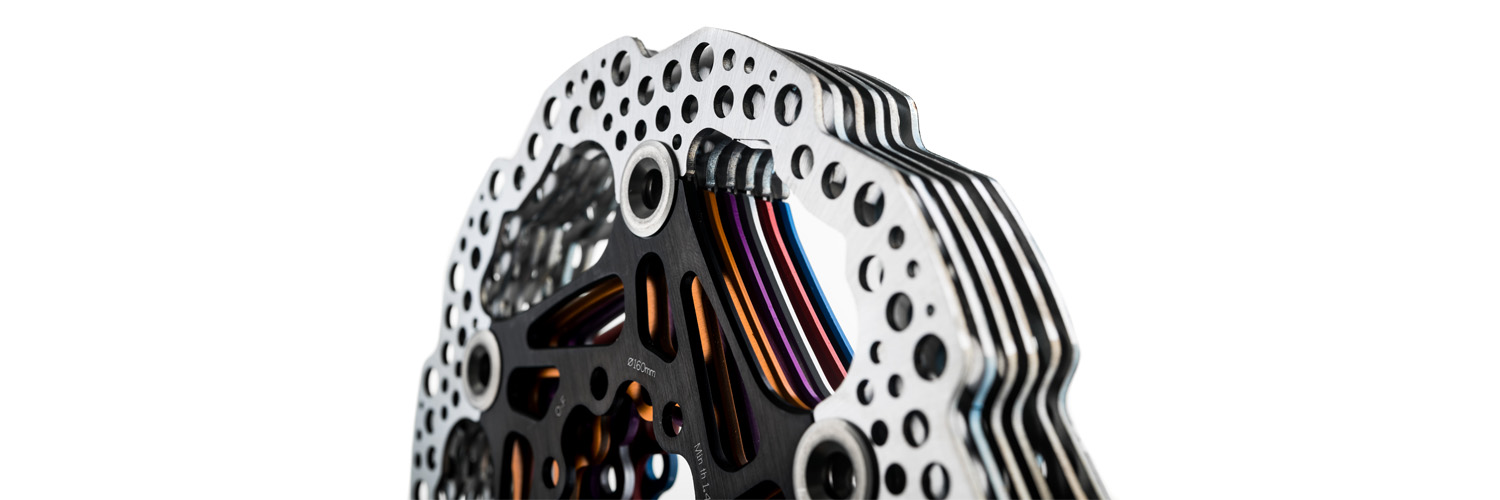
Simple physics means that a larger rotor acts as a more powerful brake. The downside is the larger a rotor is slightly heavier (and some frames and forks may not be compatible with the largest sizes). Some riders prefer to run a slightly larger front rotor compared to the rear, as that’s where braking power is most important.
More and more mountain bikes are now designed around 29in wheels – including enduro and DH bikes. It’s worth remembering that (at equal disc size), the larger the diameter of a wheel, the lower the braking force at the tyre. And, the bigger/heavier the wheel, the more momentum it generates and the harder it is to slow it down. Therefore, you may want to size up your rotor if you ride 29in wheels. Regardless of wheel size, a heavier rider and bike require more force to slow them down. We now offer a 225mm rotor for DH and e-bikes to compensate for the extra weight and speed that they bring.
We’ll be honest here: your Hope brakes will probably work with nearly every other manufacturer’s rotors. Some of our competitors’ discs are good, even very good. There’s also the bad and the ugly out there though. We manufacture our discs 100% in house: laser cutting, heat treating, grinding and riveting. We therefore naturally recommend that you use our rotors with our brake units.
Setting up your brakes to get the most out of them
To get the most out of your brakes, you need to take particular care about set up. A bit of time spent at the start will mean that your brakes perform noticeably better as a system.
Firstly, we design our brake system to work as a package and can only ensure the optimum working condition when everything is used together. That is the master cylinder and lever, hose, brake fluid, caliper, pads, discs and brake mount. You aren’t going to void your warranty if you use another manufacturer’s pads, discs or mounts, but the brake might not work quite as well as it can.
Brake mount
It’s important to make sure that your brake caliper is square to the disc. If not, the pads will hit the rotor at an angle. Why is that bad? Well, the whole pad may not connect with the rotor, so you don’t get full power, and it’s likely to make for a noisy brake as well. All of our brake mounts are CNC machined specifically to ensure the caliper position will be optimal and square. Poorly cast and forged mounts can easily be a little out, and that’s before we get on to using bodges like stacking washers.
While on the subject, the brake mounts on a frame may not be perfectly square. Paint blobs, metal burrs or less than perfect manufacture can sometimes leave them a little off. Have a check for anything obvious and if you have any doubts, a bike shop has specific tools to check and rectify them.
Brake pads
We think pads might be one of the most important and most overlooked components of your brake system. There are hundreds of brake pad manufacturers from the best to the worst. Using poor quality brake pads can turn back any brake from any manufacturer into a reminder of what it was to use cantilever brakes in wet and muddy conditions. We have carefully selected our brake pad suppliers, using only two european sources because we know that we can rely on consistent quality. All our brake pads are dyno tested in-house at Barnoldswick.
We offer our pads in two different compounds: different grades of organic and one sintered. In general, our organic compounds have great bite from cold, but can wear a little quicker in some conditions. Sintered pads are longer lasting, deal with high temperatures better giving them outstanding resistance to fade, but have slightly less bite from cold.
Fitting
When fitting your brakes, make sure you follow the guidance in the tech manual that comes with your brake, paying attention to torque settings. Take care to ensure you align the rotor centrally in the caliper. The second half of our video here is useful guidance:
Bite point and reach
Our Tech levers offer tuneable bite point and reach. Bite point adjust sets how far the lever needs to travel before the pads hit the rotor. Lever reach adjust sets how far away the lever sits away from the bars. Each setting is down to personal preference, but it’s worth playing with both to find the best setting for you.
Hose cutting
Our brakes come shipped fully bled and with enough hose to fit any normal bike. That might mean that you end up with excess hose, particularly if you ride a small frame size. Functionally, the brake will work just fine, but excess hose looks ugly and in a worst case scenario is more likely to get tangled over something.
We recommend that you follow the steps in our video if you need to shorten your hose at home:
Brake bleeding
First and foremost, you need to ask yourself if the brake really needs bleeding. Thinking about it, automotive vehicles are all using hydraulic brakes based on the same technology and do you ever think to take your car to the garage to bleed the brakes? We reckon that in 80% of cases poor brake feel is a consequence of bad brake setup rather than related to brake bleed. If your brakes were performing well previously, we recommend that you run through the set up steps and check that your pads/rotor haven’t been contaminated. There’s definitely no need to bleed your brakes after each race run.
If you haven’t bled your brakes in a couple of years, or have needed to open the system (maybe to cut the hose, or thread it through an internally routed frame), then a brake bleed may be beneficial though.
Rather than talking you through each step, we recommend you follow:
Other maintenance tips
Over time, a little maintenance will keep your brake working at its optimum. Pistons can get a little sticky as dirt works its way in. This leads to the brake feeling less responsive or the pistons not acting equally and dropping the power of the brake. Fortunately, we’ve got another video of how to give your pistons a quick clean up here: